My entry for the xmas sewing comptetition with the sewing directory and cloth magazine was a sewing roll tutorial, I was pleasently surprised when it got placed 🙂 I have made a few of these now to use at my workshops and classes so that everyone has a set of sewing instruments to use also making life easier to tidy up. I think they are brilliant as they are smaller than a sewing box and can go into a bag to get taken places with me!
Materials needed:
Pick coordinating colours for the fabrics. You could personalise this gift by embroidering the budding seamstress’ name on the front or add some lovely embroidery, beads or braid. All the fabric I have used is off my scrap box but this is such a simple style you could easily use a piece of fabric with sentimental value or even patchwork. The possibilities are endless.
Two pieces of fabric in coordinating colours & one piece of wadding. 11” x 14” for the outer and inner shell.
Two pieces of fabric & one piece wadding 4.5” wide x 10” long for the scissor pocket
One piece of fabric 3”x 5” for the additional pocket
One piece fabric and one piece felt 3”x 6” for needle book
One piece fabric 5” x 3” for button pocket
One piece fabric 7” long by 1.5” wide (width will be double plus a bit the width of elastic you will use). Piece of elastic (I used .50”) 4.5” long for the thread holder
1” piece of Velcro to hold the button pocket down. Button for the scissor pocket.
One piece of ribbon 30” long for the tie.
How to:
- Iron seams down on the additional pocket, the button pocket and fold the thread holder fabric in half width wise and iron down the seams.
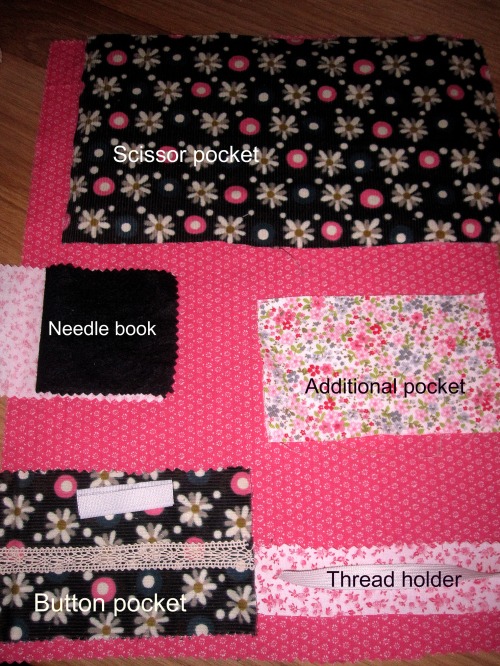
- Zig zag the additional pocket top edge only.
3. Straight sew the button pocket top edge sewing down the Velcro as you go.
4. To put the scissor pocket together, make a sandwich of the fabric right sides together and add the wadding to the top. They should go fabric right side up, fabric wrong side up and wadding.
 5. Sew along three edges, clip the corners and turn inside out. You should now have a piece of wadding encased between two layers of fabric. Turn a hem on the remaining side and iron down, sew shut. Set your machine to a smaller straight stitch and using the gauge quilt the pocket sewing about 1” lines.
6. Mark the middle of the pocket and using the buttonhole foot of your machine, add a button hole.
7. Now take the bottom shell fabric you cut. Place the pocket 1” away from the two side edges and 1” away from the top (sort of like a frame) and pin this down.
8. Mark thru the buttonhole where the button should be and add your button on.
9. To make the needle book, cut around the fabric and the felt with pinking shears, if you don’t have them then hem the fabric, the felt wont fray so don’t worry about that. Place the felt on the wrong side of the fabric; sew a line down the middle of both layers (felt and fabric).
10. Leaving a 1” gap between the scissor pocket and the side edge of the bottom shell fabric pin the needle book in place. Remember that you only sew down one half of it, so that you can close it!
11. Leaving 1” gap between the needle book and the scissor pocket, pin down the additional pocket. You should have ironed down the seams (step 1)
12. Leaving another 1” gap between the bottom of the needle book and the side seam pin down the button pocket. Pin down the other side of the Velcro to the bottom shell fabric and sew this in place.
 13. To make the thread holders, take the ironed piece of fabric (which should look like a long tube) and place the elastic on top of the wrong side. Straight stitch down one short side and one long side leaving one short side free to turn this around. Now using a chop stitch, pencil or point turner, turn the fabric inside out so that the right side of the fabric comes thru, meanwhile hold the free end of the elastic and pull out and pin at the bottom. Sew this down so that the fabric tube gathers. Iron this down. Pin 2” from the bottom of the additional pocket and .50” from the side edge and the button pocket edge. Sew the two sides down making sure not to pull. Sew once mid way down so that you have two holders.
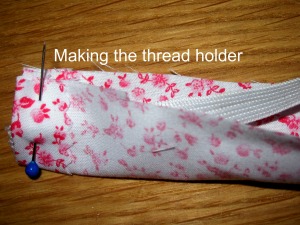 14. Sew all the pockets down. Add buttons and ribbon embellishments where you want to.
15. Fold the ribbon in half and place it with the fold on top of the edge of the fabric. (scissor pocket top of fabric)
16. Place the top shell fabric on top and the wadding on top of that. So you should have a sandwich; bottom shell fabric right side up with all the pockets facing up, top fabric right side down and wadding on top.
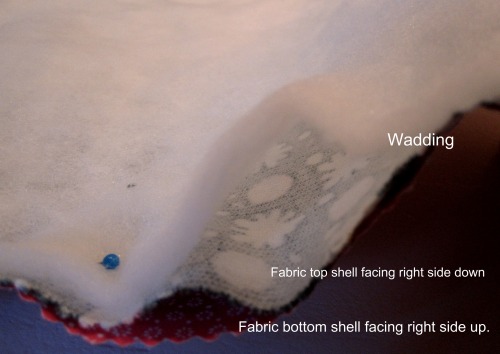 17. Sew three sides down leaving an opening at the bottom of the sewing roll. Clip corners turn inside out, push corners out, turn a hem in at the gap and straight sew down the four sides.
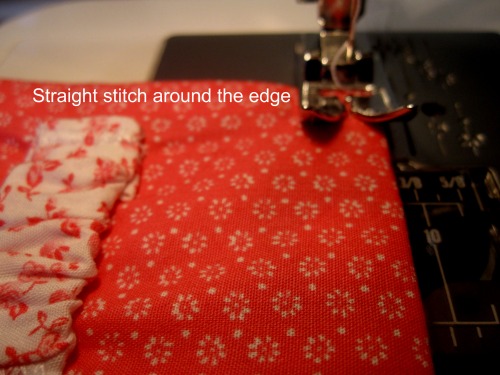
18. Decorate the top if you wish. Add the sewing suppliers and enjoy!





That’s lovely! I especially like how you did the spools holder.
I made your pattern twice and everything was quite simple EXCEPT how to make the thread holder,so I just made it my way.Thanks for sharing! These will make nice Christmas gifts for my quilting group.